Getting started as a team
By providing team features such as project collaborators or notifications, SymfonyInsight is well suited to development teams.
Getting started with SymfonyInsight as a team consists of three simple steps:
- Sign up with SymfonyInsight
- Add a project by giving SymfonyInsight access to your code
- Grant access to your collaborators
Step 1: Sign up with SymfonyInsight
When working in a team, you are likely to need several collaborative features provided by SymfonyInsight such as project collaborators. We recommend you to purchase the Team plan as it is the most likely to match your needs. Have a look at the pricing page to buy it.
Additionally, as a team you might need to transfer the plan you buy to someone else. This is why we recommend teams to create a SymfonyConnect account dedicated to their company or team. This will allow you to transfer the credentials easily as the account won't be a personal one.
Once you purchased a plan and are logged in, you will see your Dashboard, a page aggregating all the notifications related to your projects over time. At first, your Dashboard is empty: click on "Add a project" to start filling it.
Step 2: Add a project by giving SymfonyInsight access to your code
SymfonyInsight needs access to your code to analyze it. SymfonyInsight can access code stored in GitHub, Bitbucket, GitLab, custom Git repositories, etc.
Once SymfonyInsight has access to your code, it will automatically start a first analysis of your code.
Why should I specify a project type?
Assigning the correct project type is important as some metrics only run on a subset of project types. For instance, it doesn't make sense to check for a favicon in a simple PHP library. Likewise, all rules specific to Symfony applications should not run against WordPress plugins. Thus, choosing thoroughly the category fitting the best with your project will remove false positives and improve the analysis accuracy.
Interpreting your first report
Depending of the size of your project, the analysis will take from seconds to minutes to complete. Once finished, you'll see the scoring of your project. The project scoring is divided into four main sections:
Quality Grade, which visually summarizes the quality level of your project. SymfonyInsight uses a quality scale based on medals and numeric score. The five medals, from highest to lowest grade, are: platinum, gold, silver and bronze. They are represented by the following icons:

On top of that, you'll see a number that grades your quality between
0and100. This numeric score gives you a more precise estimate to track the evolution of your project quality in time.- Error severity list, summarizes all the errors grouped by severity. This helps you and your team focus first on fixing the most critical errors.
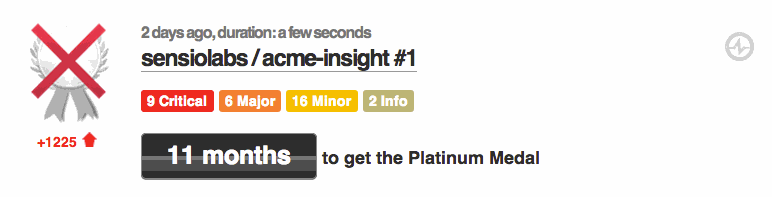
Time to improve, displays the amount of work needed to improve the project quality to the highest level. In this example, approximately 11 months of work are needed to achieve that quality level. Move your mouse over this section to reveal the amount of work needed to increase the quality by just one level:
- Critical security alerts, shows the list of errors that could cause serious security problems.
In addition to the previous project scoring, SymfonyInsight generates a fully detailed report showing every project error and instructions about how to fix them.
The full analysis report is divided into three main sections:
- Quality score, describes the current quality level of the project using the same medal and numeric scale mentioned before. It also indicates the amount of work needed to achieve the next quality level.
- Filters, this section is mostly useful for large projects with lots of errors. It allows you to filter the error list using different criteria, such as the error severity, the type of the error and the developer who introduced the error.
- Violations list, this is the most important section, because it displays the full list of errors found during the project analysis. Click on the title of any violation to reveal its contents:
- Title, briefly describes the nature of the error.
- Title actions, the button with the question mark icon allows you to read the documentation associated with this rule. The button with the trash bin icon allows you to ignore all the violations that are similar to this.
- File, it shows the full path of the file that contains the error and the line of code where the error is located. The file path is a link that points to that very same line and file at the GitHub repository.
- Code and description, this section shows in context the snippet of code that introduced the error and a longer description of the cause of the error.
- Actions menu, it displays several buttons with actions related to the error, such as commenting it, ignoring it and opening an issue directly on GitHub.
Step 3: Grant access to your collaborators
Project development is usually a team work. It is important to share the analysis results with every developer in the team and this is the purpose of collaborators. Your collaborators can read the analyses of your projects, run new analyses, and comment on the violations. They cannot change your projects configuration or add a new project.
Note
The collaborators feature is only available on the Team plan. You can manage your current plan on your account page.
To grant access to collaborators, click on a project and click on "Edit project". In this page, you will be able to add collaborators by using their SymfonyConnect username.